Intro: I spend a great deal of time working on using MOM to monitor non-domain computer. Here is what I found:
– MOM 2007 require domain trust, a non-domain computer does not have domain trust and will not work
– every documentation from Microsoft “claim” it is suppose to work, but no where in any white paper talks about “what” you are suppose to do!!!!
– by mixing a few documentation together below is the full detail on how to get this to work… Yes, it does work per the documentation…
– I did this a while back so feel free to correct me on the fine detail as I might have forgotten what they are.
– repeat Step 3 to 6 for every Monitoring Client. Step 1 and 2 is for the MOM Server
– this is not a simple task… this includes modification of host files locally on the monitor agent (will explain why later)
– some references are:
http://technet.microsoft.com/en-us/library/bb735417.aspx
http://technet.microsoft.com/en-us/library/bb735413.aspx
http://technet.microsoft.com/en-us/library/bb432149.aspx
some other Microsoft whitepapers…
Requirement:
– if this non-domain computer is outside of a firewall, make sure the proper port (port 5723 on both end) is open on both end to route data to the proper servers
– you will need a Certificate Server (yes… a REAL certificate server… it can be a self generated, but if you are going to do this in mass, you will want to have a certificate server). you can have one by going to Add/Remove program of a Windows 2003 server and install one
– you will need files such as MOMCertImport.exe as found it on the install media in \SupportTools\
Step 1: Install the proper certificate from the Root CA Server.
1. From the MOM Server, open a web browser and point it to your certificate server http://your_certificate_server.xxx.com/certsrv
note1: certsrv this is the default subweb location within IIS when you install the certified server.
note1: in most case you are trying to do this over the internet, which is why my example uses a URL. you will need to make sure the certificate server is accessible thru the web.
a. Log into the site
2. Click the Request a Certificate link.
3. Click the advanced certificate request link.
4. Click Create and Submit a request to this CA link.
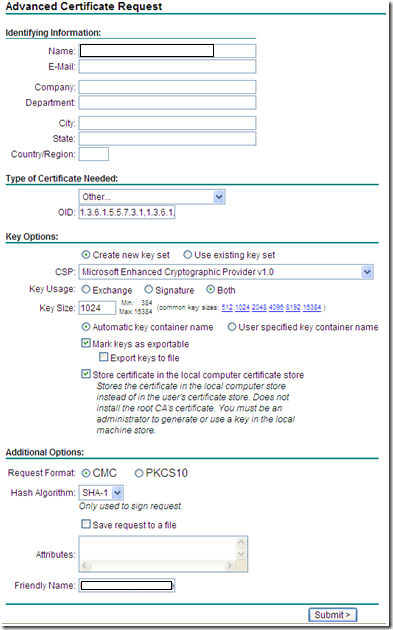
5. In the Name field, enter the FQDN (Fully Qualified Domain Name) of the MOM Server, make sure to include all domain info if the MOM Server is part of a domain. (Ex: myworkstation.abc.local)
6. In the Type of Certificate Needed field, select Other.
Note, OID field is: 1.3.6.1.5.5.7.3.1,1.3.6.1.5.5.7.3.2 (no spaces between the OIDs or around the comma separating OIDs), to avoid error, do a copy and paste.
7. Click the Mark keys as exportable check box.
8. Click the Store certificate in the local computer certificate store check box.
9. Enter the FQDN of the Client, this field should be the same as step 5.
10. Click Submit.

11. Once your request is submitted, log on to your Certificated Server’s MMC console. And authorize the request (aka: log into the computer and open the MMC)
a. Note: once authorize the request, you have 10 days to pickup and install the certificate.
12. Once the request is authorized, you can return to the webpage (http://your_certificate_server.xxx.com/certsrv) to retrieve the authorized certificate.
13. Click the View the status of a pending certificate request link.
14. When you click the proper certificate you will be directed to a new page with the opportunity to install the certificate.
15. Click Install this Certificate and click yes to the Security warning dialog.
16. This should finish installing the required certificates for the server.
Step 2: Export the Root CA certificate from your MOM server
1. Once you have the certificate install on your MOM. you will need to export it so you can install it on the client.
2. On the Client, open an MMC (Microsoft Management Console) instance by clicking on Star, then Run and type MMC.EXE and click OK.
3. Once the MMC console is opened, click Add/Remove Snap-In, click Add, and then click on Certificates located in available Standalone Snap-ins.
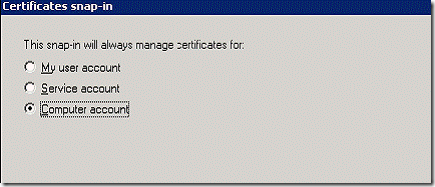
4. Once you click Add, it will give you three choices and you will need to pick Computer. Click Next.

5. Then accept the default computer (which is localhost) and click Finish. Click Close and then click OK which should conclude the MMC snap-in configuration.
6. Navigate to Trusted Root Certificate Authorities.
7. You will see you certificate on the right hand side. Right click on the certificate and click All Tasks and then Export.
8. A Wizard will prompt you telling you that it is starting the export process, click Next.
9. The next step will ask you if you want to export the Private Key. In this case, you want to do this so click the selection “Yes, export the private key” and click Next.
9. This part is very important because if you do not pick the right export format, the utility will not work. You will want to pick “Personal Information Exchange – PKCS #12” and click Next.

10. When the Wizard prompt you for a password, and use abc123 to simplify the process
a. Note: In order for the import tool to work properly you will need to input a password. I try leaving it blank, it will fail
9. The Wizard will then prompt you for a location to save the exported certificate. To simplify the process, you may save it to the same directory where the MOMCertImport.exe tool is located. Once you have entered a location and name click Next. (by saving the certificate in the same location as your MOMCertImport.exe will make your life easier when working with it)
10. Verify the information is correct and hit Finish.
11. It should have exported a .p7b file, this is your MOM server’s certificate (which you will need for every agent you want MOM to monitor).
Step 3: Install the Root CA certificate on the Monitoring Client
1. You will need to import this certificate into the server or client (Client) you are working on. Copy the MOM Agent Installation file (the MOMCertImport.exe file) and the MOM certificate (should be a p7b file) to the C:
Optional: Copy the MOM Agent Installation files to the local C: will help with the setup process. If you do copy the files to the local C:, be sure to delete the files when you are done.
2. On the Client, open an MMC (Microsoft Management Console) instance by clicking on Start, then Run and type MMC.EXE and click OK.
3. Once the MMC console is opened, click Add/Remove Snap-In, click Add, and then click on Certificates located in available Standalone Snap-ins.
4. Once you click Add, it will give you three choices and you will need to pick Computer. Click Next.
![clip_image002[5] clip_image002[5]](https://yiusan.files.wordpress.com/2009/10/clip_image0025_thumb.gif?w=435&h=187)
5. Then accept the default computer (which is localhost) and click Finish. Click Close and then click OK which should conclude the MMC snap-in configuration.
6. Navigate to Trusted Root Certificate Authorities.
7. Right click on Certificates (which is located right under Trusted Root Certificate Authorities) and click Import.
![clip_image004[5] clip_image004[5]](https://yiusan.files.wordpress.com/2009/10/clip_image0045_thumb.gif?w=482&h=295)
8. Click on Import and when prompted click Next.
9. At this point you will be prompted for the certificate file, click Browse.
10. Change Files of Type to PKCS #7 Certificates (*.spc,*.p7b )
11. Click the appropriate certificate file from the MOM Agent Installation files (the_name_of_the_cert.p7b) mentioned in step 2 during the export.
12. Click Open, then Click Next, Accept defaults and Click Next, then Click Finish.
![clip_image006[4] clip_image006[4]](https://yiusan.files.wordpress.com/2009/10/clip_image0064_thumb.gif?w=244&h=188)
13. We have just imported the Root CA that will validate our next certificate.
Step 4: Request and install the proper certificate from the Root CA Server on your Monitoring Client.
1. Directly from your Monitoring Client, open a web browser and point it to your certificate server http://your_certificate_server.xxx.com/certsrv . Click the Request a Certificate link.
2. Click the advanced certificate request link.
3. Click Create and Submit a request to this CA link.
4. In the Name field, enter the FQDN (Fully Qualified Domain Name) of the Client, make sure to include all domain info if the Client is part of a domain. (Ex: myworkstation.abc.local)
5. In the Type of Certificate Needed field, select Other.
Note1, OID field is: 1.3.6.1.5.5.7.3.1,1.3.6.1.5.5.7.3.2 (no spaces between the OIDs or around the comma separating OIDs), to avoid error, do a copy and paste.
6. Click the Mark keys as exportable check box.
7. Click the Store certificate in the local computer certificate store check box.
8. Enter the FQDN of the Client, this field should be the same as step 5.
9. Click Submit.

10. Once your request is submitted, log on to your Certificated Server’s MMC console. And authorize the request (aka: log into the computer and open the MMC)
a. Note: instead of calling in for every certificate request, it is possible to bulk authorize certificate request.
b. Note: once authorize the request, you have 10 days to pickup and install the certificate.
12. Once the request is authorized, you can return to the webpage (http://your_certificate_server.xxx.com/certsrv) to retrieve the authorized certificate.
13. Click the View the status of a pending certificate request link.
14. When you click the proper certificate you will be directed to a new page with the opportunity to install the certificate.
15. Click Install this Certificate and click yes to the Security warning dialog.
16. This should finish installing the required certificates for the server.
Step 5: Install MOM Agent
1. To start the install process for the MOM Agent, run MOMAgent.msi in the MOM Agents\agent\i386 folder from your MOM install media.
Note: a amd64 and ia64 version is also available in MOM install media., you will need to make sure you install he proper version for the Client you are working on
2. After executing the MSI, you should get a Welcome screen. Click Next.
3. Accept default destination folder, click Next.
4. On the next page, uses the installation default and make sure Specify Management Group information is check
![clip_image002[4] clip_image002[4]](https://yiusan.files.wordpress.com/2009/10/clip_image0024_thumb.jpg?w=446&h=345)
5. The next page is where you enter the Management Group Name, Management Server, and Management Server Port. Use the following for each field
a. Management Group Name: hosted
b. Management Server: XXX.yourdomain.com (what ever is the name of your public URL of your MOM server)
c. Management Server Port: 5723
6. Next page will ask you for a Gateway Action Account. Select Local System and click Next.
7. At the Ready to Install page, click Install.
8. When the installation finishes, just click Complete to exit the program.
Step 6: Updating host files
1. Because the Monitoring Server is not using part of the hosted domain, it must have hosts file entries to locate the Monitoring Server by name.
Note: this is the stupid part… even if you have the Management Server with a FQDN, it require you to also specify the local domain name of the server in order for this to work…
2. On Client, use Notepad to add entries to the C:\windows\system32\drivers\etc\hosts file for Monitoring Server.
3. Enter the following entries: 1.1.1.1 your.local.domain.name.hosted.local (instead the public IP and also the local DNS name, which the local DNS name is often not the same as your FQDN)
4. Save the file and exit Notepad.
Step 7: Install Certificate on MOM Monitoring Agent
1. To start the process of importing a certificate to MOM Monitoring Agent, open a MMC by clicking the Start Menu and then click Run. Type MMC and press Enter.
2. Add Certificates and click Add. Click Computer Account and then click Finish.
3. In the Certificate Tree on the left hand side, click Personal and the click Certificates.
4. You will see you certificate on the right hand side. Right click on the certificate and click All Tasks and then Export.
5. A Wizard will prompt you telling you that it is starting the export process, click Next.
6. The next step will ask you if you want to export the Private Key. In this case, you want to do this so click the selection “Yes, export the private key” and click Next.
7. This part is very important because if you do not pick the right export format, the utility will not work. You will want to pick “Personal Information Exchange – PKCS #12” and click Next.
![clip_image006[6] clip_image006[6]](https://yiusan.files.wordpress.com/2009/10/clip_image0066_thumb.gif?w=387&h=299)
8. When the Wizard prompt you for a password, and use abc123 to simplify the process
a. Note: In order for the import tool to work properly you will need to input a password.
9. The Wizard will then prompt you for a location to save the exported certificate. To simplify the process, you may save it to the same directory where the MOMCertImport.exe tool is located. Once you have entered a location and name click Next.
10. Verify the information is correct and hit Finish.
11. To import the certificate to MOM Monitoring Agent, we will use the MOMCertImport.exe tool located in the MOM Agent Installation files.
Note: If you copy the MOMCertImport.exe file to C: as mentioned in prior step
a. The command line arguments are as follows: c:\>MOMCertImport.exe <certificate filename>
b. Input the password (abc123) you enter in Step 8 when prompt
Note: In this example both the tool and the certificate will be located on the root of the C: drive. You will not receive any response after you import the certificate
![clip_image008[7] clip_image008[7]](https://yiusan.files.wordpress.com/2009/10/clip_image0087_thumb.jpg?w=480&h=88)
12. Once this completes you will need to restart the Operations Manager 2007 Health Service to load the certificate.
13. To restart the Operations Manager 2007 Health Service, click Start, then click Run and type services.msc. Locate the service called OpsMgr Health Service and restart the service by clicking the Restart icon on the services toolbar.
Filed under: Microsoft Operations Manager MOM SCOM | Tagged: Installing Microsoft Operations Manager Agent on a Computer on a different domain than the MOM Server, Microsoft Operations Manager MOM SCOM, MOM, MOM2007, SCOM, SCOM2007 | Leave a comment »


![clip_image002[5] clip_image002[5]](https://yiusan.files.wordpress.com/2009/10/clip_image0025_thumb.gif?w=435&h=187)
![clip_image004[5] clip_image004[5]](https://yiusan.files.wordpress.com/2009/10/clip_image0045_thumb.gif?w=482&h=295)
![clip_image006[4] clip_image006[4]](https://yiusan.files.wordpress.com/2009/10/clip_image0064_thumb.gif?w=244&h=188)
![clip_image002[4] clip_image002[4]](https://yiusan.files.wordpress.com/2009/10/clip_image0024_thumb.jpg?w=446&h=345)
![clip_image006[6] clip_image006[6]](https://yiusan.files.wordpress.com/2009/10/clip_image0066_thumb.gif?w=387&h=299)
![clip_image008[7] clip_image008[7]](https://yiusan.files.wordpress.com/2009/10/clip_image0087_thumb.jpg?w=480&h=88)


